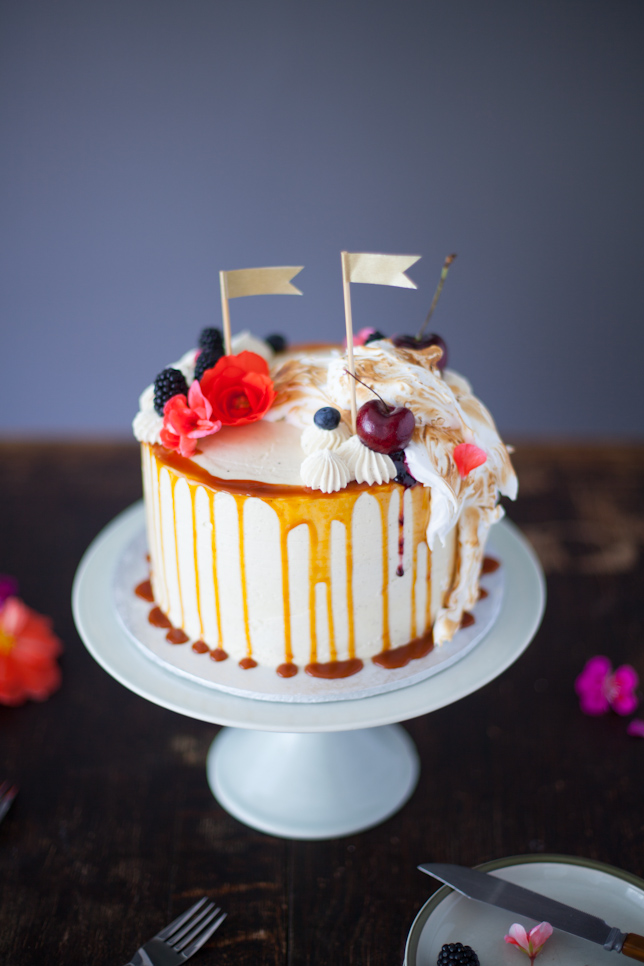

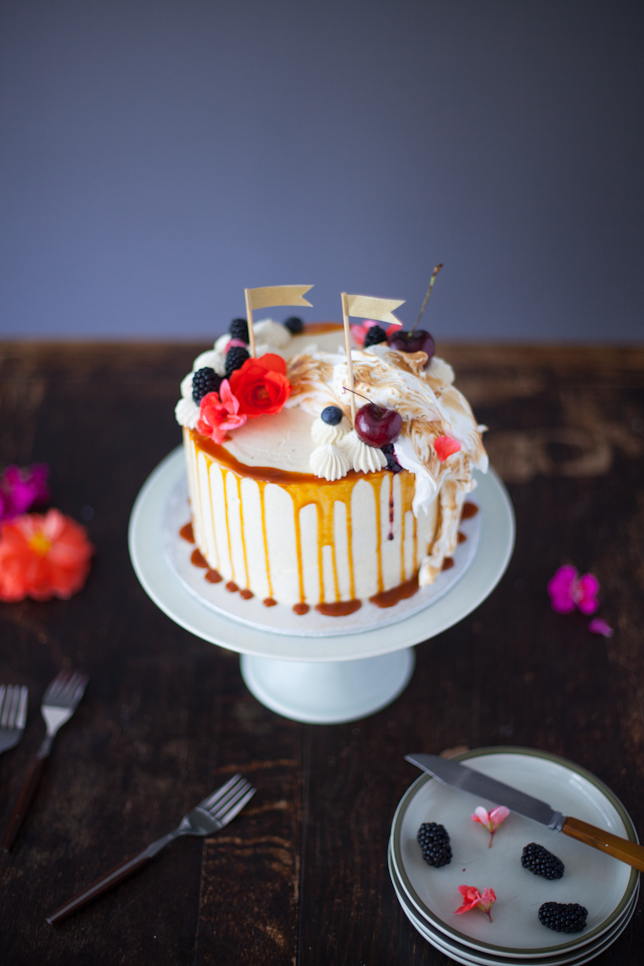
Fragrant earl grey buttercream, tangy tart blackberry-laden vanilla cake layers and an artful swath of toasty torched swiss meringue – it’s all a beautiful mess! Inspired by pastry chef Andy Bowdy (his cakes are gorgeously gargantuan, momentous and almost human!), I’ve been wanting to try decorating a cake with the “torched meringue” look – and, with a mini blowtorch burning a hole in my cupboard, the earl grey blackberry cake with torched meringue idea was born!


I decided to make swiss meringue for the artful swath, using the same method I use for my meringue kisses – that is, whipping the beautiful daylights out of a mixture of hot egg whites and granulated sugar. KitchenAid Canada sent me one of their new, very cute KitchenAid Artisan Mini Mixers in the mail! When I pulled the shiny pink mixer out of its box, my first thought was “oh my gosh, this is children’s sized.” I really thought it was so small at first and I was worried the cake and buttercream recipes I had in mind wouldn’t fit the bowl… but I was PLEASANTLY surprised that this lil baby whirred up my cake batter, buttercream and meringue just as beautifully as my old classic Kitchen Aid, with no spillover! In fact, the bowl is a generous 3.5 quarts, though it looks small. Which I guess is the point of the mini mixer – it’s compact, and perfect for a small kitchen! My only wish is that the bowl had a handle, as I’m so used to maneuvering the bowl by the handle. (Teddy and I also had fun turning the KitchenAid cardboard box into a race car! Cake board rounds make excellent steering wheels, FYI!)
My favourite tips for getting a lovely, fluffy swiss meringue – ensure your bowl is very clean and completely grease-free. You can even rub the inside of the bowl with a wedge of lemon to cut any semblance of grease. Use a candy or digital thermometer! You’ll want the hot egg and sugar mixture to reach 160 degrees Fahrenheit in order to kill any nasty bacteria hanging out in the eggs.

Along with the earl grey swiss meringue buttercream, I had some leftover salted caramel in the fridge so I added some for the dramatic drip effect. For the filling, I used blackberry jam and lemon curd, both store-bought – but you could make your own if you’re feeling truly heroic. Now go forth and make cake!!


Earl Grey Blackberry Cake with Torched Meringue
ingredients
For the Cake
- 1 cup unsalted butter, room temperature
- 1 3/4 cups granulated white sugar
- 4 large eggs
- 2 teaspoons pure vanilla extract
- 3 cups unbleached all purpose flour
- 1 tablespoon baking powder
- 1/2 teaspoon sea salt
- 1 1/4 cups whole milk
- 1 cup fresh blackberries, chopped into smaller pieces
For the Earl Grey Buttercream
- 2 cups unsalted butter, room temperature
- 1/4 cup loose Earl Grey tea
- 1/2 cup plus 2 tablespoons egg whites
- 1 1/4 cups granulated white sugar
- 1 1/2 teaspoons vanilla bean paste
For the meringue
- 1/4 cup (75 ml) egg whites
- 3/4 cup granulated white sugar
For the caramel and fillings
- For the fillings, I used store-bought blackberry jam and store-bought lemon curd.
- You could also use store-bought caramel or dulce de leche; simply warm it up slightly to loosen it so it “drips.”
instructions
Make the cake
- Preheat the oven to 350 degrees. Prepare three 7×2 inch round cake pans with vegetable oil spray and parchment paper rounds.
- In the bowl of a stand mixer fitted with the paddle attachment, beat the butter and sugar on high speed until light and fluffy, scraping down the bowl as needed, about 2 minutes.
- Add the eggs one at a time until incorporated.
- Add the pure vanilla extract.
- In a medium bowl, sift together the flour, baking powder and salt.
- With the mixer on low, add the flour mixture in three batches, alternating with the whole milk, ending with the flour mixture.
- Mix until incorporated into a batter, about 30 seconds – do not over mix!
- Fold in half of the chopped blackberries; divide the other half into three equal portions.
- Pour batter evenly into prepared cake pans; use an offset spatula to level the batter.
- Sprinkle each batter-filled pan with the remaining blackberries, pressing in lightly.
- Bake on the centre rack for 23-25 minutes, turning pans halfway to ensure even baking. Cake is baked when a toothpick inserted in the center comes out clean.
- Let cool completely on wire racks before frosting.
Make the buttercream
- Place 1 cup of the butter in a saucepan with the loose tea. Heat over medium heat until the butter melts, then reduce the heat to low and simmer for 5 minutes.
- Remove from the heat and let the tea steep for another 5 minutes.
- Strain the butter through a fine-mesh-sieve set over a bowl and refrigerate until it reaches softened butter consistency – 20 to 30 minutes.
- Place the egg whites and sugar in the bowl of a stand mixer, whisking to combine.
- Fill a medium saucepan with water and place it over medium-high heat.
- Place the stand mixer bowl on top, creating a double-boiler effect (the bowl shouldn’t touch the water.)
- Whisking intermittently, heat the egg mixture until it registers 160 degrees Fahrenheit (70 degrees Celsius) on a candy thermometer.
- Carefully move the mixer bowl back to the stand mixer.
- Using the whisk attachment, beat the egg white and sugar mixture on high speed for about 8-10 minutes until it reaches medium-stiff peaks. The mixture should have cooled down now to room temperature.
- Stop the mixer and swap out the whisk attachment for the paddle attachment.
- With the mixer on low speed, add the vanilla paste, tea infused butter and remaining 1 cup of butter about a tablespoon at a time.
- Once incorporated, turn the mixer to medium-high and beat until buttercream is thick and lustrous.
- (If your swiss meringue buttercream “breaks” apart, your butter might have been too cold – place the stand mixer bowl back onto the water filled saucepan and gently heat up for a minute or so, then try beating the mixture again. You’d be amazed at how something can go from curdled soup to fluffy perfect buttercream. See this post for more troubleshooting tips!)
Make the meringue
- Place the egg whites and sugar in the bowl of a stand mixer, whisking to combine.
- Fill a medium saucepan with water and place it over medium-high heat.
- Place the stand mixer bowl on top, creating a double-boiler effect (the bowl shouldn’t touch the water.)
- Whisking intermittently, heat the egg mixture until it registers 160 degrees Fahrenheit (70 degrees Celsius) on a candy thermometer.
- Carefully move the mixer bowl back to the stand mixer.
- Using the whisk attachment, beat the egg white and sugar mixture on high speed for about 8-10 minutes until it reaches medium-stiff peaks, glossy and fluffy.
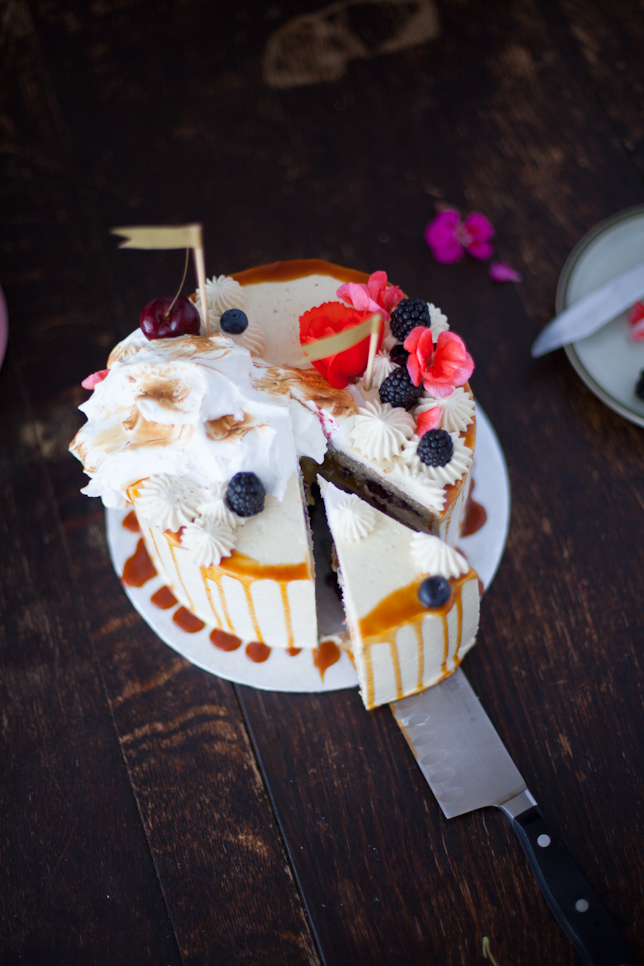
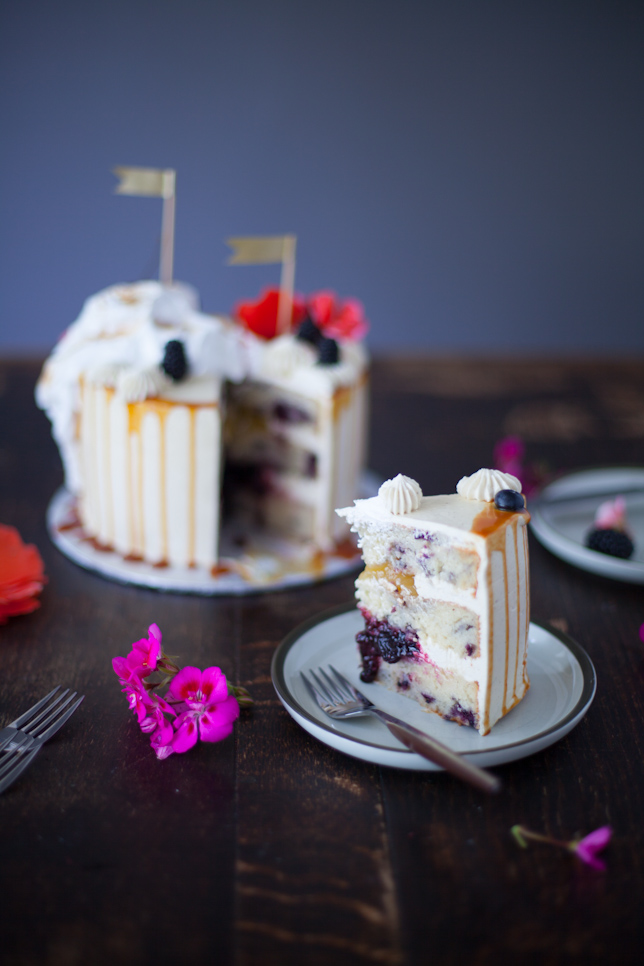
Assemble the cake
- Using a serrated knife, level off your cake layers, reserving trimmings for chowing down on later.
- Place a dab of buttercream on a cake board or large plate and put the first cake layer on top.
- Using a piping bag fitted with a large star tip, pipe a generous buttercream dam on the top far edge of the cake layer.
- Fill the center area with blackberry jam.
- Place the second cake layer cut-side-down on top of the first.
- Pipe another generous buttercream dam on top of the second layer.
- Fill the center area of the second layer with lemon curd.
- Place the final cake layer cut-side-down on top, pressing in lightly to adhere. Slightly adjust your layers as needed.
- Using an offset spatula, frost the entire cake with a crumb coat, using a cake bench scraper to smoothe as needed.
- Place the cake in the freezer to set up, about 12 minutes, or in the fridge for 30 minutes.
- Remove cake from the freezer; using your offset spatula, frost a second layer of buttercream, smoothing with cake bench scraper.
- Place the cake back into the freezer for about 12 minutes.
- Remove cake from the freezer. Using a small spoon, add drips of caramel.
- Using a large spoon, dollop a generous amount of meringue on top of the cake. Using your spoon (but without touching the cake), spread the meringue into an artful “swath”, going across the center of the cake and going down one side.
- Get your blowtorch ready! In a safe uncluttered area of your kitchen, torch the meringue in little bursts to avoid melting away your buttercream. (freezing it beforehand as above will help here too); torch until you’re satisfied with the toasted-level of your meringue.
- Finally, decorate with blackberries, fresh fruit and/or edible flowers!
Sofia
What a fun looking cake! And I love the combination of earl gray, blackberries, and lemon. Sounds delicious!
Justine @ JustineCelina.com
I’m practically drooling on my keyboard over here, Lyndsay! What an absolutely stunning cake and post. From the combination of flavours, to the beautiful, moody photography, to that amazing pink mixer! Absolute perfection, my friend. A true delight to my eyes!
Also, thank you for the edible fall flower content request. We’re hoping to get a post out this fall themed around edible flowers, but if we’re not able to make that happen, I’ll still send you over a list for fall cake decorating and food styling. :)
Heather
That cake is so stunning!
lynn | the actor's diet
So beautiful! I love the idea of a mini stand mixer!
Cassie | Crumb Kitchen
I’m dead. This cake killed me. First, it’s adorable. The little piping decoration you’ve added to the top are so cute, plus the torched meringue looks scrumptious. Adding on the drizzle and the little berries inside is genius. AND that pink KitchenAid mixer is amazing, to boot. Wonderful post, Lyndsay!
Lavues
The cake looks dainty and tasty, love the decoration on top!
Terri @FoodMeanderings
That looks so delicious! I love the idea of Earl Grey Buttercream – I loveEarly Grey tea lattes so I only imagine how heavenly that would taste. Cute pink mixer too!
Mairead
Blackberries and Earl Grey are two of my favourite flavours, so I’m definitely bookmarking this for a special occasion! Also, that stand mixer is so pretty!!!
Marisa
Such a beautiful cake, I am sure it tastes AMAZING
Amanda Orlando
Your creations always amaze me! This not only looks pretty but I’m sure it tastes delicious too
Dana
Oh Lyndsay, this is stunning (as usual)!
I love incorporating Earl Grey into desserts, so I can imagine how delicious this is. There is just something about that flavor.
Newport Butane
Wow this cake is pretty awesome. I’m gonna try your recipe.
I will share that on our Instagram page. Is it ok?
Thanks for sharing
Jane @ NewportButane.com