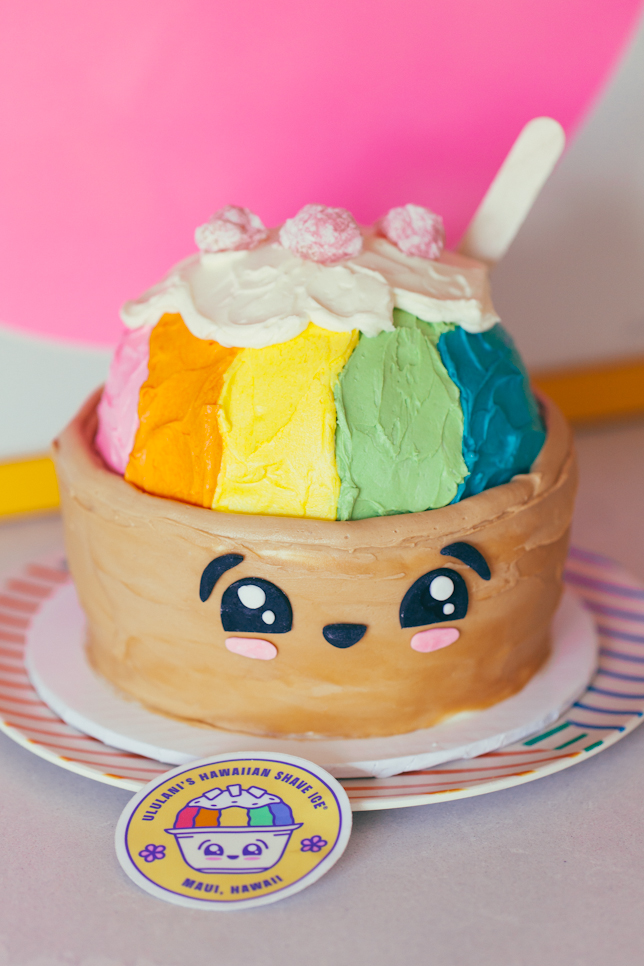
My Kawaii Shave Ice Cake has a bit of a tan, just like me! Hehe. We were in Maui for Spring Break with my whole fam! So of course we ate all the things, including several stops for shave ice. After a wild and windy day at a beach in Paia, we hit Ululani’s for a cool-down treat. Shave ice is a uniquely Hawaiian dessert, and Ululani’s is known to be the best, for good reason – blocks of ice shaved so finely it’s almost creamy, saturated with colourful syrups, topped with sweetened condensed milk, and chewy addictive bits of mochi! Teddy fell in love with the kawaii shave ice mascot, so we bought a sticker – and I immediately thought HOW CUTE it would be to turn it into a cake, of course!

How To Make A Kawaii Shave Ice Cake
Want to guess what cake pan I used to make this cake? Yes, honestly I never would have guessed my SPORTS BALL pan would become the cake pan hero of my life. But it has so many uses beyond BALLS! For this cake, I used two 7×2-inch round cake pans, plus the sports ball pan.
I made a vanilla coconut cream cake with almond vanilla buttercream. You can easily make this a vegan cake, too! Double this chocolate cake recipe or use your favourite vegan vanilla cake recipe! Swap out the butter in the recipe below for plant-based, unsalted brick butter. I also made mochi bits! Super easy to make – I followed this mochi recipe by Mochi Mommy!
As usual, spritz your cake pans with vegetable oil and line with parchment paper cut to size. For the sportsball pan, sometimes I even smear butter in there and lightly flour it for maximum cake-release power.
Tips, Tools and Ingredients
PS: There is a TEENSY bit of cake carving in this cake. Honestly, my spatial awareness generally is 5/10, so I’m surprised that even I could shape this thing – haha. I used a small sharp knife and probably unsafely trimmed the bottom two layers of the cake into more of a dessert “cup” shape.
I debated whether or not I wanted to use my multi-opening piping tips for the rainbow shave ice, but instead I went for straight-up buttercream rainbow stripes using my offset spatula! Gel colour in the ROYGBIV fam will be your friend for colouring the buttercream. You could also use natural food colouring powder, too!
I used fondant to make the face, and I used a small open-circle tip to pipe the edge of the bowl. I have no idea why I made the bowl so TANNED but maybe I was subconsciously hoping to hold onto my own tan, haha. Feel free to keep the bowl plain old white vanilla buttercream, if desired.

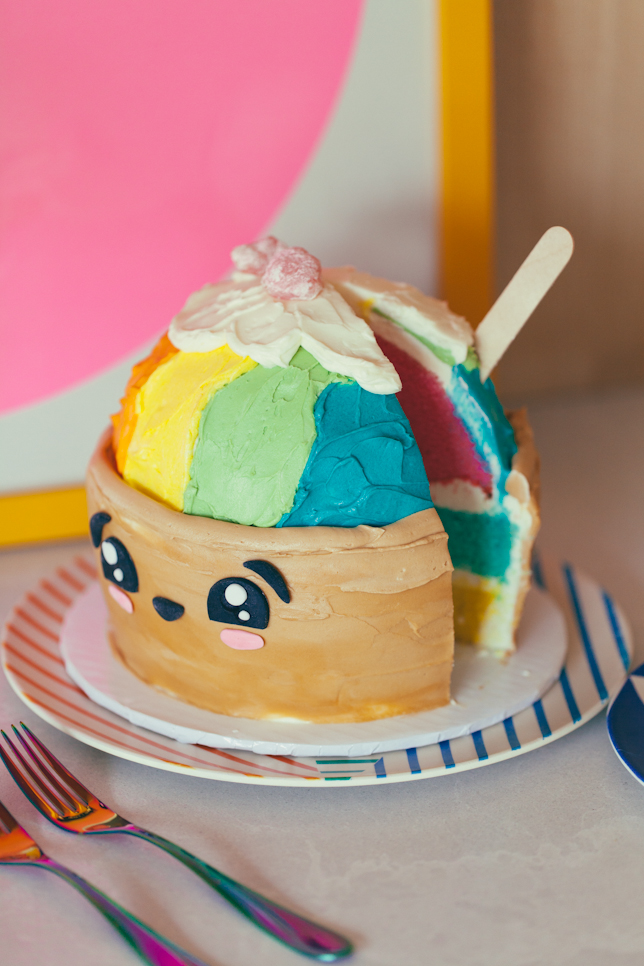
Oh it was hard to slice into my special friend, but it had to be done! And… he was DELISH! Haha… Check out the video of a munchkin on speed making this Kawaii Shave Ice Cake below. (Plus, subscribe to my Coco Cake Land YouTube channel! Woohoo!!!)


Kawaii Shave Ice Cake
ingredients
For The Vanilla Coconut Cream Cake
- 1 1/2 cups full-fat coconut milk, 375 ml
- 1 tsp apple cider vinegar
- 1 cup unsalted butter, room temperature, 224 grams
- 1 3/4 cup granulated white sugar, 350 grams
- 4 large eggs, room temperature, 240 grams
- 1 tsp pure vanilla extract
- 1 tsp coconut extract
- 3 cups cake flour, 390 grams
- 1 tbsp baking powder
- 1 tsp baking soda
- 1 tsp fine sea salt
For The Almond Vanilla Buttercream
- 2 cups unsalted butter, room temperature, 454 grams
- 4 cups icing sugar, 520 grams
- 1 tsp pure vanilla extract
- 1 tsp pure almond extract
- pinch fine sea salt
instructions
Bake The Cakes
- Preheat the oven to 350°f / 175°c. Prepare cake pans by spritzing with vegetable oil and lining flat pans with parchment paper cut to size.
- In a small bowl, whisk to combine the coconut milk and apple cider vinegar. Allow to curdle, about five minutes.
- In a large bowl, whisk to combine the cake flour, baking powder, baking soda and salt.
- In the bowl of a stand mixer fitted with the paddle attachment or with a handheld mixer, beat together the butter and sugar until light and fluffy, about two minutes, scraping down sides of bowl with spatula as needed.
- With the mixer on low speed, add the eggs one at a time until incorporated.
- With the mixer on low speed, add the vanilla extract.
- With the mixer on low speed, alternate adding the dry ingredients with the coconut milk mixture, beginning and ending with the dry ingredients. Mix on low speed to combine, about one minute.
- Divide the batter – two cups of batter into one medium bowl, divide the remaining batter into two bowls. Tint the two cups of batter with pink gel food colouring, and tint the other two bowls using sky blue and lemon yellow gel food colouring, mixing gently to combine.
- Place the pink batter into the sports ball pan. Place the yellow batter and blue batter into their cake pans.
- Bake for 20-22 minutes, until cakes are lightly golden and puffed, and a toothpick inserted into the center comes out with only moist crumbs. The sports ball pan will need an extra 10 to 15 minutes. Let cakes cool completely on wire racks before frosting.
Make The Buttercream
- In the bowl of a stand mixer fitted with the paddle attachment, beat the butter, icing sugar, vanilla and almond extracts on low speed to combine, 20 seconds.
- Increase to high speed and beat until buttercream is light and fluffy and doubled in volume, about two minutes.
Make The Mochi
- I made a very simple mochi recipe from Mochi Mommy – recipe link in Notes!
Decorate The Cake
- Using a cake board or plate, add a small dab of buttercream to the center. Place the yellow cake layer on top, levelling the cake if needed. Spread a generous amount of buttercream on top. Place the blue cake layer on top (levelling if needed). Add a large dollop of buttercream on top of the blue layer.
- Place the pink half sphere cake layer on top, flat side down. Press to nestle into the buttercream. Insert a wooden BBQ skewer into the top center of the cake as a dowel, if needed. Using a sharp knife, trim the bottom two layers into a dessert cup shape.
- Frost the entire exterior of the cake with the buttercream. Chill in the fridge or freezer to set; remove from fridge and frost another cleaner layer of buttercream.
- Chill the cake again in the fridge or freezer, 15 minutes. Meanwhile, divide the buttercream into 7 small bowls – leave one bowl plain, and colour each bowl with individual colours of light brown for the shave ice cup, pink, yellow, orange, green and blue.
- Remove cake from fridge. Using a toothpick, draw lines into the sphere cake to individuate the rainbow coloured stripes. Using an offset spatula, spread the pink buttercream along the stripe lines as cleanly as possible. Continue with the rest of the colours!
- Using the light brown buttercream, frost the shave ice cup as cleanly as possible, using a cake bench scraper to smooth, if needed. Fill a piping bag fitted with a medium open circle tip with the remaining brown buttercream. Pipe the edge of the dessert cup along the top edge of the cup, to differentiate the cup from the rainbow stripes!
- Chill the cake again for another 10 minutes. Meanwhile, fill a piping bag fitted with a medium open circle tip with white buttercream. Make the fondant face pieces and gently press to adhere into the front of the cake.
- Remove cake from fridge; pipe the snow cap of "sweetened condensed milk" using the white buttercream. Use offset spatula to smooth.
- Add the light pink mochi bits to the top of the cake, and insert a small wooden dessert spoon for additional decor, if using! Enjoy!
steph
so cute! makes me want a side of shave ice!
Lyndsay // Coco Cake Land
aw thank you Steph! ^__^
kim m
Are you only using 1/2 of the sports ball pan? The pan comes in two half spheres. Are you just filling and baking the one?
Lyndsay // Coco Cake Land
Hi Kim, so sorry for the late reply. Yes, that’s correct just one half of the sphere for the rounded top! :)