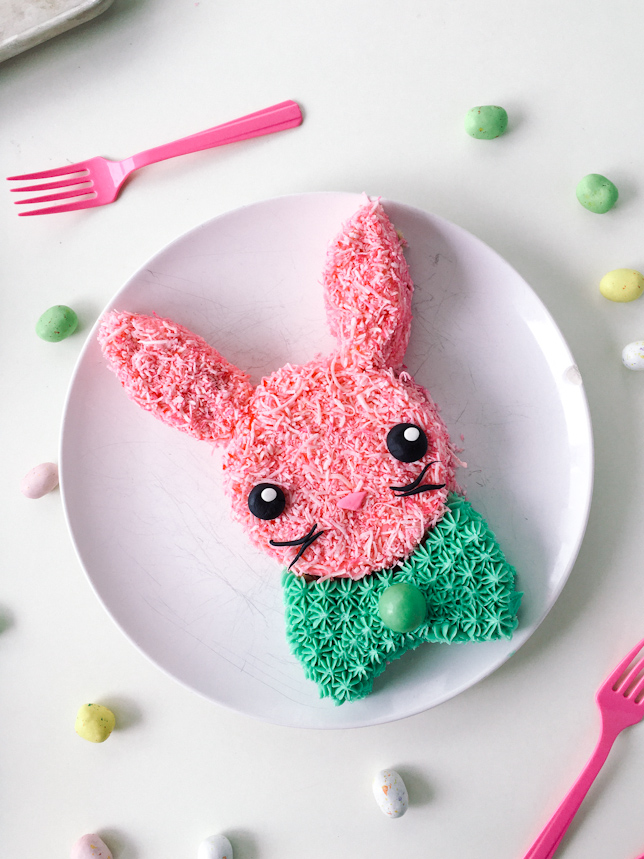

Aiyahh. How cute are these funny little pink bunny cut up cake buddies? I wasn’t sure if a sleeping bunny might be a little on the creepy side. But I rolled with it. This tutorial is going to show you a few things. One – how to colour your own shredded coconut. I’ll just tell you right now. Do you have a large ziplock bag? Do you have some pink gel food colour or regular old watery food colouring? Do you have shredded coconut? Combine all that in your ziplock bag and shake it like your life depended on it. Before you know it, you will have PINK TINTED coconut. It’s that easy, snowball.
Two: how to make two round cakes TRANSFORM into the cutest (maybe too steely-eyed?) chill bunnies just relaxing on a plate, being all cool bow-tie casual. A coconut-covered bunny cake brings back both fond and hilarious memories for me – it was my mom’s go-to cake concept in the 1980s, and my sisters and I had plenty of bunny cakes with gumdrop noses and licorice whiskers to go along with ye olde pizza parlour/bowling birthday parties.

Initially I was going to bake two 9 inch round cakes and make one single bunny cake, based on the awesome tutorial I found from Homan At Home. But then I got charmed with the idea of making mini bunny cakes, so I ended up getting three mini bunny cakes out of the two 9 inch round cakes. If you wanted to make one larger bunny cake, the basic idea is identical – you’ll save one round cake for the bunny’s face, and the second round cake gets “cut up” into two ears and a bow-tie, respectively.
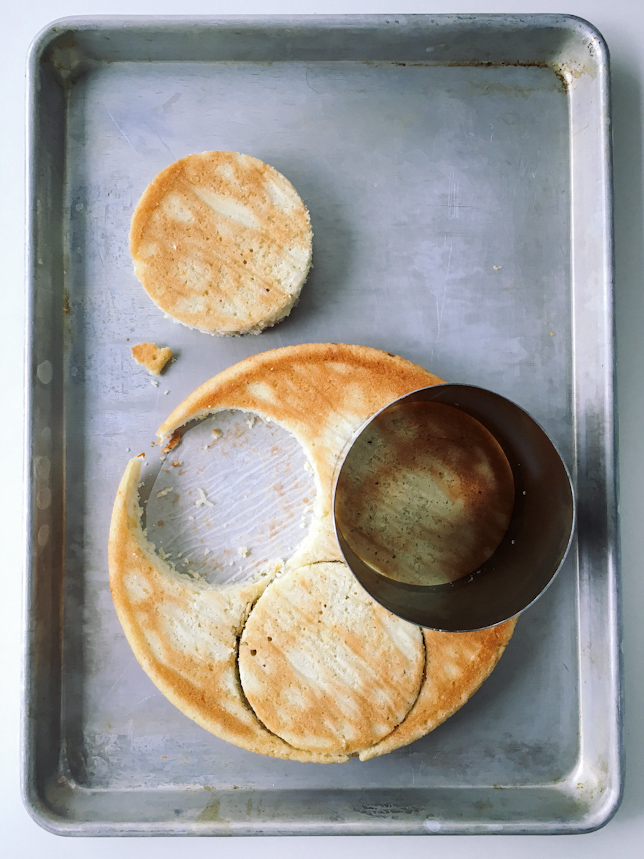
Here I’m punching out 4 inch rounds to make 3 mini bunny cakes.
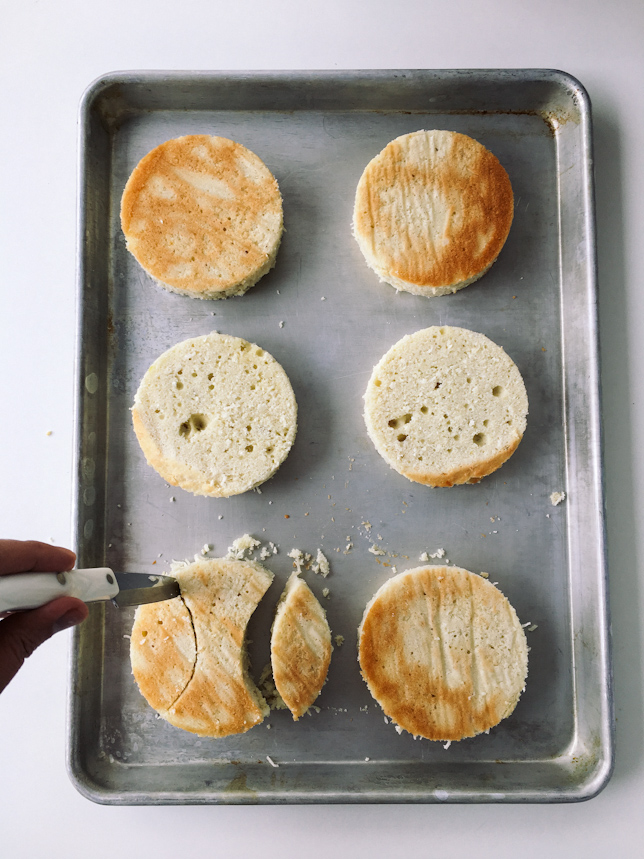
Using a sharp paring knife, cut out the bunny ears from the round cake. I cut the first bunny ear, which is the oblong leaf type shape, and stacked it on top of the other side of the cake, using the first bunny ear as a template of sorts. Then, the middle part becomes the bow tie!


Arrange the cake on a plate with the cut-up pieces so you get the idea of the shape.

Frost the top and sides of the round cake with a good helping of pink buttercream (recipe below!).

Now, cover the cake with the shredded pink coconut – I found the best way to do this was to pour the shredded coconut onto the same sized plate, then sort of “dip” or dunk the frosted cake into it, patting the coconut in with my fingers. The coconut sticks easily to the buttercream. For the sides, I rolled the cake like a wheel in the coconut and it stuck perfectly.
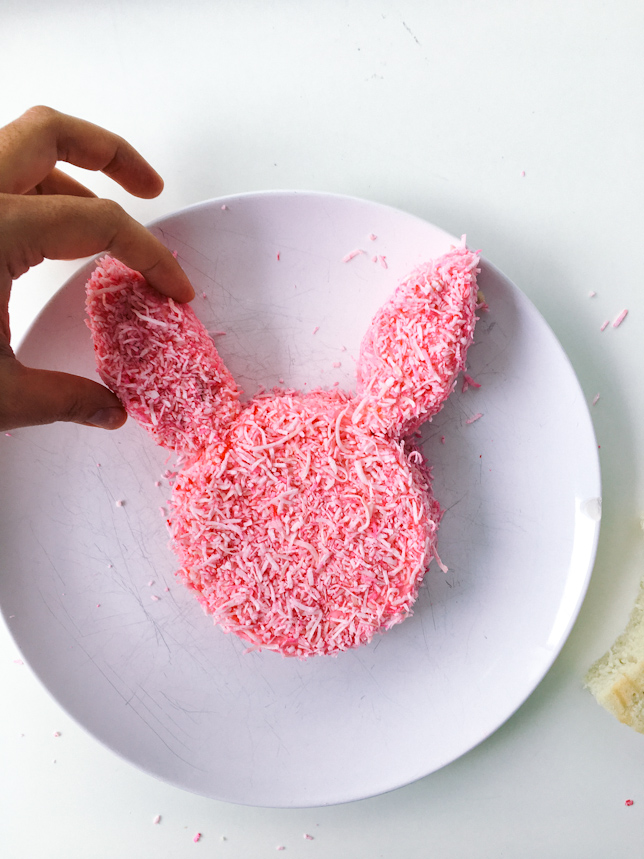
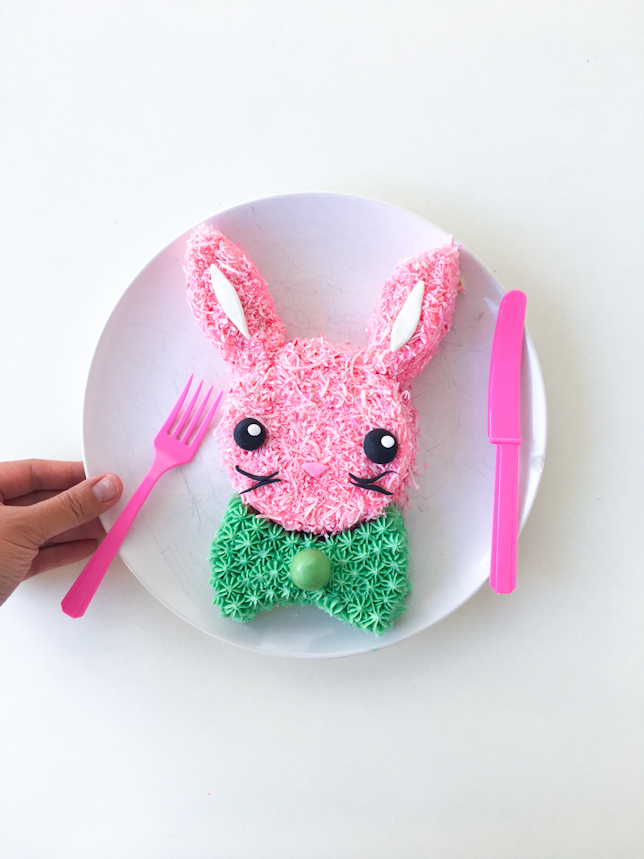
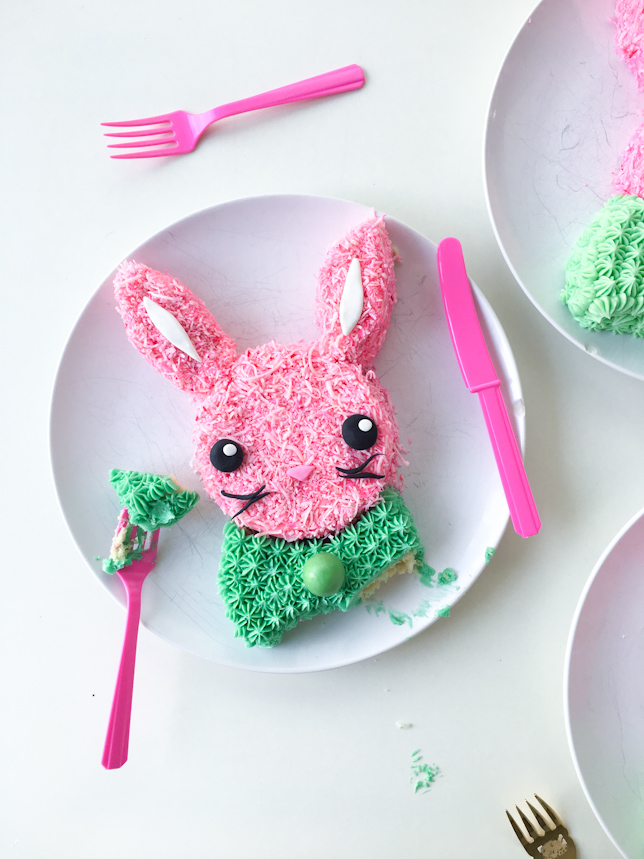
Position the bunny ears to your liking!

Nestle the bowtie right up in there.

Colour the reserved vanilla buttercream a happy shade of green! (recipe and instructions below).

Fill your piping bag with an open star tip and pipe away! I piped the sides and top in the little drop star pattern.
I finished the bowties by placing a large malt ball candy in the centre. I used store-bought fondant for the eyes, nose and inner ears – but grocery store candies and shoestring licorice will work great too!

Pink Coconut Bunny Cut Up Cake
ingredients
For the coconut cake
- 1 cup unsalted butter, room temperature
- 1 3/4 cups granulated white sugar
- 4 large eggs
- 2 teaspoons pure vanilla extract
- 3 cups all purpose flour
- 1 cup unsweetened shredded coconut
- 1/2 teaspoon salt
- 1 tablespoon baking powder
- 1 400 ml can of high quality coconut milk, not reduced fat
For the buttercream
- 2 cups unsalted butter, room temperature
- 4 cups icing sugar
- 2 teaspoons pure vanilla extract
- dash of milk
- gel food colouring in electric pink and leaf green
For the pink coconut + decor
- 4 cups of unsweetened shredded white coconut
- 1/4 teaspoon pink gel colour, or use grocery store food colouring in small 1/4 teaspoon increments until desired colour is reached
- For the eyes, nose and inner ears, I used store-bought coloured fondant – though I realize many don’t have those things on hand, which is where grocery store candy comes in handy! (I rhymed.) Starburst works great for a little pink nose, just warm it up in your hand first to make it more pliable! Any round circular candies work great for eyes, and black shoestring licorice is the classique choice for whisker action!
instructions
Make the cake
- Preheat oven to 350 degrees. Spray two 9 inch round cake pans with vegetable oil; cut out parchment paper circles to line pans.
- In a medium bowl, stir the flour, shredded white coconut, salt and baking powder until combined. Set aside.
- In the bowl of your stand mixer fitted with the paddle attachment, beat the butter and sugar together on high speed until light and fluffy, about two minutes. Scrape down the sides of the bowl.
- With the mixer on low speed, add the eggs, one at a time, until fully incorporated. Add the pure vanilla extract.
- With the mixer on low speed, add the flour mixture in thirds, alternating with the coconut milk, beginning and ending with the flour mixture. Mix on low until gently but thoroughly combined, scraping down the sides of the bowl; do not over mix the batter.
- Divide batter evenly into prepared 9 inch cake pans. Bake in the middle rack of the oven, turning pans halfway through baking time to ensure even baking.
- Bake for 25-30 minutes or until a toothpick inserted into the centre of each cake comes out clean. Let cakes cool completely in pans on wire racks.
Make the buttercream
- In the bowl of a stand mixer fitted with the paddle attachment, beat the butter on high speed until light and fluffy, about two minutes.
- Scrape down the sides of the bowl. With the mixer on low speed, add the icing sugar 1/4 cup at a time until the icing sugar is incorporated. Add the vanilla and dash of milk.
- Now, crank that dial to maximum and let it whip into a fluffy buttery sugary frosting.
- Remove about 1/3 of the buttercream out of the stand mixer bowl and place in a separate medium bowl. Add the pink gel food colouring to the stand mixer bowl and beat on high until the colour has incorporated.
- Using a spatula, colour the reserved buttercream with the desired amount of green gel food colouring – I used 1/8 teaspoon to get light green, and a little more for the slightly darker shade.
- Fill a piping bag fitted with an open star tip (I used a small French multi-pronged open star tip) with the green buttercream and set aside.
Assemble the cake
- Remove the cooled cakes from their pans. Using a serrated knife, level the cake, then follow the instructions as noted above in the photos!
movita beaucoup
That bunny’s not sleeping! She’s looking down! Probably batting her eyelashes after someone says she’s adorable. So, bashful not creepy.
Lyndsay // Coco Cake Land
Hehe! Oooh good one, coy bunny! Xo
Amanda
Your cakes are always the the cutest! I was totally drawn to the sleeping bunny first before I even read your post HAHA! Definitely not creepy!
Lyndsay // Coco Cake Land
Haha I’m glad you think so!! Thanks Amanda! Xo
Diane
These came out so cute! I love the idea of making them mini!
Lyndsay // Coco Cake Land
Thanks for the great inspiration, Diane!!
Alana
THIS IS THE CUTEST!! seriously can’t get over how easy you made it look. also, i love the retro vibes of that cuisinart mixer!! i wonder if moses would appreciate a bunny cake this year…
Lyndsay // Coco Cake Land
Haha thanks Alana! YES I BELIEVE MOSES WOULD APPRECIATE A BUNNY CAKE, LOL! xoxo
Heather
So freaking cute! That sleepy one is mah fave.
Lyndsay // Coco Cake Land
Haha! Oh I’m so glad. honestly I wasn’t sure if it was like a sedated bunny that I was then CUTTING INTO IT like a cake creep… LOL. XO
Jackie Christine
Would this recipe be possible without the Cuisinart Precision Master Stand Mixer™?
Lyndsay // Coco Cake Land
Do you mean can you make the cake and buttercream without that specific mixer? OF COURSE! You can use any stand mixer, or electric beaters and a large bowl! Or do you mean, if Cuisinart hadn’t sponsored this post, would I still have made a pink bunny cut up cake? OF COURSE! Bunnies 4 Lyfe!
Ashley
Amazing! I bet it’s so fun to dig into a piece. Although not sure how my bunny would feel about it ;)
Lyndsay // Coco Cake Land
Ashley!! No bunnies were harmed in the making of these cakes, I promise!! ^__^ Thanks for stopping by! xo
Sean@Diversivore
Your sleeping bunny is definitely NOT creepy! It’s adorable. I mean, if you’re worried about cutting into them, just go for the chocolate Easter bunny approach – eat the ears first so they don’t hear you coming. :)
Really they’re all adorable cakes. They’ve got that great sort of kitschy-cute yet very well executed vibe going on, and I love it. It’s unabashedly, unapologetically adorable, sweet, and delicious looking. I’m sure my kids would love these – but then again, who wouldn’t? Cheers!
Marisa
How absolutely adorable and you really make it seem quite easy to put together…. I would definitely go for the ears first, love this
MDIVADOMESTICA
Awe! These bunnies are so cute that you almost don’t want to eat them. ALMOST…as they are also delicious cake.
I think that is something I can get over. Sorry bunnies.